Hikers and backpackers, if you’re looking for ways to make your own backpacking food, you’ve probably heard of freeze-dried and dehydrated backpacking food, but what’s the difference between the two? Is there a difference or are they the same thing?
I often hear people using “freeze-dried” and “dehydrated” interchangeably when talking about backpacking food.
Spoiler Alert: Freeze-dried and dehydrated backpacking food are NOT the same.
This is the time of year where I’m busy prepping all of my food for the upcoming hiking and backpacking season. I use both a food dehydrator and a freeze dryer to turn my favorite home cooked meals into trail-friendly backpacking meals.
Why I Make My Own Backpacking Food
Making my own backpacking meals means I get to expand my on-trail menu to include the meals and food I love eating at home, create a lot of variety in my on-trail diet instead of buying and eating the same store-bought backpacking meals over and over again, and can save me money by not having to buy those expensive store-bought backpacking meals either online or through an outdoor retailer.
I’m going to break down the two most popular ways to make your own backpacking food, which are freeze drying and dehydrating. I’ll explain how each of these methods work share with you the differences between the two, talk about their common misconceptions, the pros and cons of each AND I’ll even walk you through how I freeze dried and dehydrated one of my all-time favorite backpacking meal recipes so you can see the differences for yourself.
Freeze-Dried vs Dehydrated Backpacking Food
Backpacking food is usually either freeze-dried or dehydrated because both of these preservation methods significantly reduce moisture content in food, making the food much lighter to carry in your food bag.
This is super important for overnight backpacking trips where you’re trying to keep the overall weight of your pack low. Not only does dried food weigh less, but it also takes up less space in your pack and food bag.
Removing moisture also significantly extends the shelf life of your backpacking food, allowing it to be stored safely for longer periods of time without growing bacteria or mold. So, what’s the difference between a freeze-dried backpacking meal and a dehydrated one? Freeze drying and dehydrating are both food preservation methods, but the biggest difference between the two is how moisture is removed from the food.
How is Freeze-Dried Backpacking Food Made?
With freeze drying, the food is first frozen solid. Then the frozen food is placed in a vacuum chamber where a vacuum is created. During the sublimination process of the cycle, the vacuum chamber is gradually warmed and the ice in the food directly turns into water vapor and is removed.
Freeze drying can remove anywhere from 98-99% of the moisture from the food leaving behind dry food that retains most of its original flavor, color and nutritional value.
How is Dehydrated Backpacking Food Made?
With dehydrating, a heating element is used to generate warm air along with a fan to circulate this air around the food, which helps promote even drying. With dehydrating, anywhere from 80-95% of the moisture in the food is removed, but it can lead to some nutrient loss and altered texture of the food.
Freeze-Dried vs Dehydrated Backpacking Food: Common Misconceptions
So now that you know how freeze drying and dehydrating works and the differences between the two food preserving methods, let’s talk about some common misconceptions.
Myth 1: Freeze-Dried Food is Just for Astronauts
You might think freeze-dried food is only for space missions, but it’s actually quite popular for camping, backpacking and emergency preparedness. You don’t have to be an astronaut to enjoy freeze dried food.
Myth 2: Dehydrated Backpacking Food is Bland & Boring
I used to think dehydrated backpacking food was like the sad, wilted salad of backpacking meals. But when done right, it can be flavorful and packed with nutrients. Sometimes dehydrated food just needs the right seasoning and a little extra love in the prepping process.
I’ve dehydrated everything from fruits and vegetables and pasta to fully cooked homemade meals and even banana nut bread for a super yummy, sweet, crunchy hiking snack.
When it comes to dehydrating your food, just have fun. Experiment to see what will work for you, your dietary needs and your taste buds.
Myth 3: Both Methods are Equally Expensive
If you’re going to make your own backpacking food at home, you’ll probably want to invest in either a food dehydrator or a freeze dryer.
A food dehydrator can range anywhere from $50, all the way up $400 or more, depending on the make, model and size of dehydrator you get. You might even already have a food dehydrator in your home. Check your oven or toaster oven to see if it has a dehydrator setting. Most foods dehydrate between 120 and 160 degrees F. Check to see if your oven runs that low. If it does, you can use your oven as a food dehydrator without having to buy one.
I have a Cuisinart food dehydrator that comes with 5 oval shaped trays and was given to me by a friend a few years ago. If you buy this one new today, it will cost around $80. I’ve made a ton of meals using my dehydrator over the last few years. It’s really easy to use.
Here’s how I use my food dehydrator. First, I line each tray with either parchment paper, a reusable Teflon sheet or one of these plastic trays that came with my dehydrator.
Then, I’ll spread a thin layer of food on each tray and stack each of the trays into the dehydrator. The thinner the layer of food, the faster the food will dehydrate.
I’ll then plug in the dehydrator, turn it on, set it to medium and then let it sit anywhere from 8 to 12 hours, depending on the food I’m dehydrating. I’ll rotate the trays a couple of times during the dehydrating process to allow for even drying of the food.
A freeze dryer is going to be much more expensive than a food dehydrator. The freeze dryer I use is the Harvest Right Home Pro Medium Freeze Dryer with Premier Industrial Pump.
Full transparency, my freeze dryer was gifted to me thanks to the incredibly generosity of Harvest Right.
A comment I hear all the time is that freeze dryers are expensive. While this may be true, a freeze dryer could be a considered an investment and something worth saving up for if you plan on using it often.
For example, say on average, a store-bought freeze-dried backpacking meal cost $13. My freeze dryer currently sells for $2,495 on the Harvest Right website, which is the equivalent to 192 of those $13 store-bought backpacking meals.
Just last year alone, I bought AND ate 75 store-bought freeze-dried backpacking meals throughout my entire backpacking season. At that rate, if I were making my own freeze-dried meals instead of buying them at the store, my freeze dryer would’ve paid for itself after having it for 2 and a half years, or less.
This winter, I’ve been busy prepping all of my meals for the upcoming backpacking season. For each batch I run in the freeze dryer, I make at least 4 backpacking meals using the leftovers from all of the meals I cook at home.
By the time I’m ready to officially kick off my backpacking season in July, I’ll have prepped over 100 freeze dried meals, which would’ve cost me $1,300 if I had boughten them in the store or online.
So, while the initial investment of a freeze dryer might seem expensive, if you use it enough, it can end up being an investment that pays for itself over time, saving you money from having to purchase the same ol’ store-bought backpacking meals over and over again for each trip you go on. You’ll also save money in food costs by making your own meals at home, you’ll know exactly what’s in each meal you make, and you’ll even help reduce your food waste since you’ll more than likely be preserving your leftovers instead of throwing them out.
Freeze-Dried vs Dehydrated Backpacking Food: Pros & Cons
Now, let’s talk about the pros and cons of both dehydrating and freeze-drying your own backpacking meals.
Pros to Dehydrating Your Own Backpacking Food
- A food dehydrator is much less expensive than a freeze dryer. You might even already have one at home. Make sure to check your oven.
- As you’ll see in the upcoming demo, dehydrating your own food is relatively easy
- You can dehydrate whole cooked meals, individual food items, soups and even sauces
- Dehydrating turns some of your favorite foods into a lightweight version that will help you save weight in your food bag
- The dehydrating process can take anywhere from 8 to 12 hours, depending on the food being dehydrated
- Dehydrating can extend the shelf life of food for up to a year when it’s stored in a cool, dry place, inside an airtight container
- Dehydrated food can be rehydrated easily with boiling water in either a backpacking pot or a Ziploc freezer bag and an insulated food pouch
Cons to Dehydrating Your Own Backpacking Food
- Foods high in fat and oil like avocados, nut butters, olives and dairy products including eggs don’t dehydrate very well, if at all
- The shelf life of dehydrated food is much shorter than freeze-dried food
- Dehydrated food loses some of its nutritional value due to the heat used during the dehydration process which breaks down the food’s vitamins and minerals. The dehydration process can also change the look and taste of the food as well
- Dehydrated food tends to be heavier than freeze dried food
- Rehydrating dehydrated food might take a bit longer than rehydrating freeze-dried food and depending on the ingredients, some dehydrated food might not rehydrate as well as freeze dried food
Pros to Freeze-Drying Your Own Backpacking Food
- Just like with dehydrating, freeze drying your own backpacking meals is relatively easy as you’ll see in the upcoming demo
- You can freeze most types of foods like fruits, vegetables, meats, dairy products, eggs, ice cream, fully cooked meals and even toothpaste. I know toothpaste isn’t a food, but I’ve used my freeze dryer to turn my favorite toothpaste into toothpaste tablets that I then bring with me on any of my backpacking trips and it’s pretty awesome!
- Freeze dried food maintains nearly all its nutritional value, original flavor and texture, even after being rehydrated
- Freeze dried food tends to weigh less than dehydrated food
- Freeze dried food has a much longer shelf life than dehydrated food, sometimes lasting up to 25 years when stored properly in an airtight container.
- And just like with dehydrated food, freeze dried food can be rehydrated quickly and easily using boiling water in either a backpacking pot or a Ziploc freezer bag and an insulated food pouch
Cons to Freeze-Drying Your Own Backpacking Food
- Freeze dryers are much more expensive than food dehydrators. You’ll want to shop around to find the right freeze dryer for you and your budget.
- One freeze drying cycle can take anywhere from 20 to 40 hours to complete, depending on the food being freeze-dried
- And sometimes, freeze-dried food may require more water to rehydrate than dehydrated food, which can be problematic if you’re camping somewhere that doesn’t have a water source nearby.
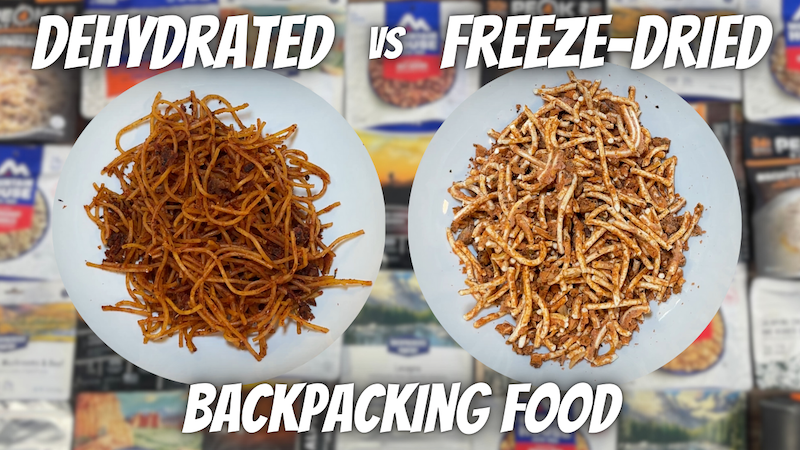
Freeze-Dried vs Dehydrated Backpacking Food: Backcountry Spaghetti
I’m going to take one of my all-time favorite backpacking meal recipes, Backcountry Spaghetti and put one serving of each in both my food dehydrator and freeze dryer so you can see for yourself the differences between these two food preserving methods.
First, I’ll start by making a batch of Backcountry Spaghetti. Click Here for the recipe.
How to Dehydrate Backpacking Food: Backcountry Spaghetti
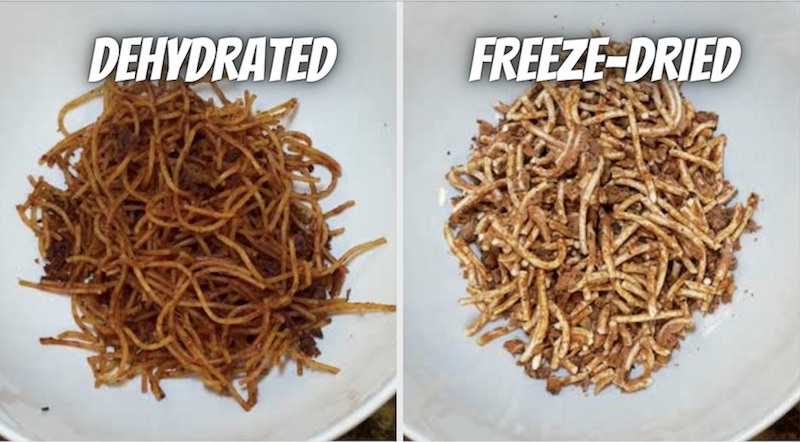
Step 1: Using a food dehydrator, spread out a thin layer of spaghetti on each lined tray. I like to do one serving per tray. This way, it makes it much easier to package up after the dehydrating process.
Step 2: Once the trays for the food dehydrator are prepped, add each of the trays into the dehydrator, put the lid on, turn the dehydrator on to medium and then let the dehydrator do its thing for the next 8 to 10 hours.
Step 3: After the food is fully dried, turn the dehydrator off and remove each of the trays and package each serving into its own container. I like to use a quart-sized Ziploc freezer bag. This way I can cook the meal directly inside the Ziploc bag using boiling water instead of having to dirty my pot and deal with cleaning dishes while at camp.
How to Freeze Dry Backpacking Food: Backcountry Spaghetti
Step 1: Using a freeze-dryer, turn on the freeze dryer and wait 15 minutes for the chamber to cool. In the meantime, prep the spaghetti for the freeze dryer by spreading it out in a thin layer on a silicone mat-lined tray.
Step 2: Once the trays are prepped, put each tray into the freeze dryer, close the valve and start the freeze-drying process. Depending on the food, each batch can take anywhere for 20 to 40 hours to complete.
Step 3: After the freeze-drying process is complete, open the valve and remove the trays from the freeze dryer. I like to package each of my backpacking meals as I go through my food prepping process. This way, each meal is ready to grab and go once I start going out for my backpacking trips. I also like to use mylar bags with an oxygen absorber to package my freeze-dried backpacking meals in. I’ll add will one serving of spaghetti per bag, which comes out to two cups of freeze-dried spaghetti.
Freeze-Dried vs Dehydrated Backpacking Food: Backcountry Spaghetti Demo & Taste Test
Make sure to watch this video for the demo AND taste test of both the freeze-dried and dehydrated version of the Backcountry Spaghetti recipe.
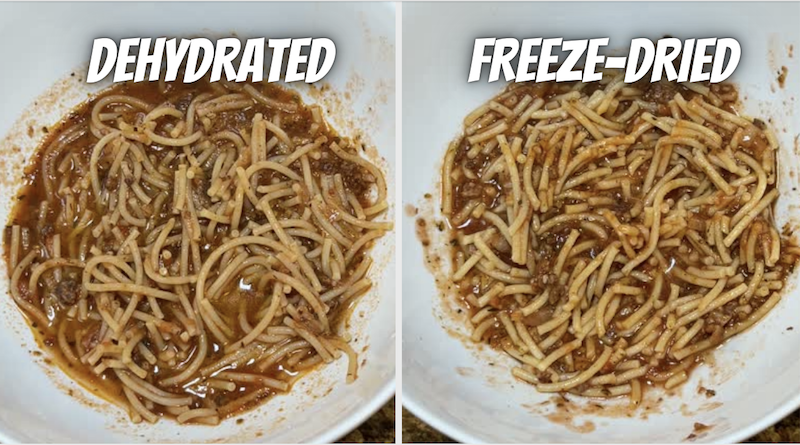
Freeze-Dried vs Dehydrated Backpacking Food: Rehydrating Backcountry Spaghetti
To rehydrate, boil water using your backpacking stove and then add just enough water to cover the food inside each bag. Let the food sit in an insulated food pouch for 10 minutes, allowing the meal to fully rehydrate. After 10 minutes, I’ll remove the bag of spaghetti from the insulated food bag, give it a quick stir and then dinner is served!
Hopefully this has helped you understand the differences between freeze-dried and dehydrated backpacking food and has made it easier for you to decide which of these food preserving methods will work better for you when making your own backpacking food.
Looking for inspiration to make your own backpacking meals? Check out some of my favorite freeze-dried & dehydrated backpacking food recipes:
2 Comments on Freeze-Dried vs Dehydrated Backpacking Food: What’s the Difference?