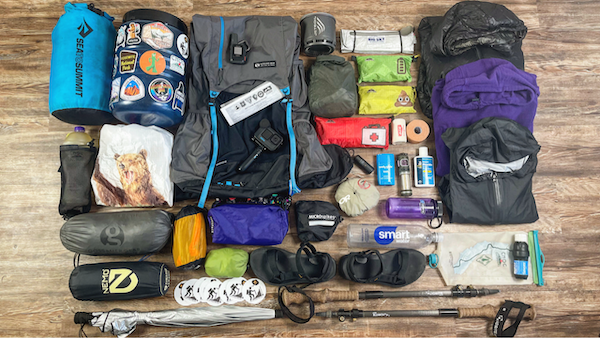
Are you in the process of trying to figure out what to pack for your next overnight backpacking trip? I’m going to walk you through each of the backpacking gear systems that have worked for me over the years and go over all of the backpacking gear I’ll be bringing with me out on trail this summer.
My goal is to help take some of the packing fatigue out of your backpacking trip planning this summer by showing you what has been working for me.
This summer, I’m hopping back on the Pacific Crest Trail to continue my solo, SoBo section hike
When putting together my backpacking gear list for my trip this year, I wanted to keep my base weight low so that I can have fun out there hiking big miles and make sure I’m able to stay safe carrying everything I need in order to be 100% self-reliant. I also wanted to make sure my pack and all of the gear I carry would fit on my body as comfortably as possible. Even with a hard-sided bear canister.
Full Disclaimer: I don’t consider myself an ultralight backpacker so if you’re looking for an ultralight backpacking setup, I’m not your girl.
For more details about each of the items I mention in this post, check out my 2024 PCT SoBo Section Hike Gear List on lighterpack.com. This list also includes links for each of the items so you can find anything on my gear list easily online.
MY BACKPACKING PACK
The pack I’ll be using out on trail this year and have been using for the last couple of years is the Gossamer Gear Mariposa 60.
Nope, this post isn’t sponsored by Gossamer Gear. I just really love this pack. Here’s why:
Removable Sitpad
Let’s start with the removable sitpad on the back panel. Instead of having to carry a camp chair or needing to find a place to store a butt pad in my pack, I use the removable pad, which sits on the back of the pack.
This pack originally comes with a SitLight Pad, but I replaced it with the Gossamer Gear Air Flow SitLight Camp Seat because it provides better airflow between my back and the back of the pack whenever I start sweating AND it also provides slightly more cushioning when using it as a butt pad while sitting on the ground.
The Pockets
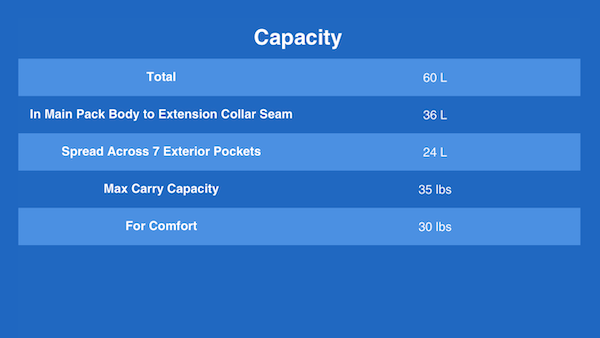
Let’s talk about all of the pockets on this pack. Throughout the Mariposa 60, there are 7 pockets:
- Two smaller, external pockets on one side, which is where I store my Water Filtration System and Poop Kit.
- 1 larger, exterior pocket on the other side, which is where I store backup drinking water, my ultralight sun umbrella and a lightweight tripod.
- 1 spacious rear mesh pocket, which is where I store my food for the day, rain gear, a pair of microspikes, my camp shoes and if my tent is wet, I store it here so I don’t have to get everything inside my pack wet.
- 1 zipper pocket on the top of the Over-The-Top closer system, which is where I’ll keep my PCT long-distance permit so I have easy access to it whenever a ranger asks to see my permit.
- PLUS, the two large functional hipbelt zippered pockets that are large enough to put an iPhone in along with a few extra snacks. This is also where I like to keep my knife, a pair of liner gloves, sunscreen and bug repellant – all things I want easy access to without having to take my pack off.
The Comfort Level
Even when my pack is fully loaded with all of my gear, food and water, this pack still fits on my body comfortably. I know it sounds weird, but sometimes I don’t even notice my pack sitting on my body because it fits so comfortably, even with a hard sided bear canister inside like the BV500, which I’ll be bringing with me this summer.
Gossamer Gear recently gave their Mariposa 60 packs a spring refresh earlier this year by adding the S-curve harness for a more comfortable fit along with new and improved load lifters that help provide even weight distribution when wearing this pack.
CLICK HERE to check out my full review of the newly updated Gossamer Gear Mariposa 60
I’ve already noticed a huge, difference when wearing this pack when having to carry heavier loads that include a fully loaded, hard-sided bear canister.
The Mariposa 60 is a super light pack, compared to other packs I’ve used over the years, weighing in at just 2 pounds with the pack body, aluminum frame, removable sitpad and hip belt.
If you’re a backpacker who’s carrying a heavier load with some bulky gear because you’re using what you got, I don’t recommend using the Mariposa 60. According to Gossamer Gear, the maximum carrying capacity for the Mariposa 60 is 35 lbs. For ultimate comfort, Gossamer Gear recommends not carrying more than a total of 30 pounds in this pack.
If your gear, food and water weigh more than 30 to 35 pounds, I’d recommend using a pack that’s designed to carry a heavier load.
On one of my pack straps, I attach a Chicken Tramper Water Bottle Sleeve, which holds my CNOC collapsible water bottle. This way, I always have easy access to drinking water whenever I’m hiking and I always have a visual on just how much drinking water I have left.
Around my waist, I always wear my Thru-Pack Summit Bum fanny pack. Inside, I keep my GoPro, which is attached to this small selfie stick and extra batteries, so I have easy access to my camera when I’m taking pictures and shooting video out on trail.
I also keep my sunglasses in my fanny pack when I’m not wearing them along with my cellphone, chapstick and extra Hungry Hiker stickers to give out to other hikers and backpackers who recognize me when I’m out on trail and say hi.
SLEEP SYSTEM
Quilt
For the last few years, I’ve been using a quilt instead of a sleeping bag. I love my Enlightened Equipment Enigma Custom Quilt.
Here are the things I customized for my quilt making it the perfect quilt for me:
- The temperature rating is 10 degrees, and the down type is 950, which makes this super warm on the coldest nights
- I got this in the regular length because I’m 5’7”
- I got this in a wide width because I’m a side sleeper and like to roll in my sleep
- I opted to customize the color of my quilt with purple, both on the inside and outside
I added a draft collar to give me the option to be able to trap the warm air on the inside on those really cold nights
There’s a sewn foot box at the bottom of the quilt, which helps keep my feet warm and is where I keep my hiking clothes and socks I plan on wearing the next day along with my water filter while I’m sleeping. I always sleep with my water filter so that I don’t run the risk of my filter freezing overnight.
The total weight of my quilt with all of its customizations is 23.85 ounces.
Sleeping Pad
This year, I decided to switch out my inflatable sleeping pad. I’m replacing my previous sleeping pad with the Nemo Tensor Extreme Conditions Ultralight Insulated Sleeping Pad in the Regular Wide.
Why did I make this switch? There was nothing wrong with the previous sleeping pad I was using which was the ThermaRest NeoAir Xtherm. BUT, a couple of students in my online backpacking program for women, The Confident Solo Female Backpacker System, who are also side sleepers, who sleep cold just like I do, kept raving about this pad so I had to check it out for myself.
So far, I’ve been loving the Nemo Tensor in Regular Wide because, first of all, the pad has more surface space with its rectangular shape as opposed to the mummy shape of my previous pad. This new shape means a more comfortable night’s sleep for me without my hip hitting the ground or either of my arms falling asleep.
Another reason why I’ve been loving this new pas is because for a cold sleeper like me, the Nemo Tensor has an 8.5 R-Value, which is even more insulated than my ThermaRest NeoAir Xtherm, which has a 7.3 R-Value. There’s a weight increase with the Nemo Tensor. It’s 22 ounces as opposed to 17 ounces for the ThermaRest NeoAir Xtherm, but the weight increase is worth it to me to have a more warm and comfortable night’s sleep.
Getting a good night’s sleep is always a high priority for me whenever I’m out on trail because if I can’t get a good night’s sleep, I can’t hike and if I can’t hike, well then why am I out on trail in the first place?
How I Inflate My Backpacking Sleeping Pad
Another gear switch I made with my Sleep System this year is how I inflate my sleeping pad. I used to use the Pump Sack that came with my previous sleeping pad, but it added extra weight and space inside my pack, and it was always kind of cumbersome to use.
I’ve been using the FlexTail Zero Pump and I love it. It’s small, light and can easily fit inside the stuff sack with my sleeping pad. With the rechargeable battery inside, the whole device only weighs 2 ounces and comes with multiple adapters that can fit over a variety of different pad nozzle sizes. Whenever I need to charge the FlexTail Zero Pump out on trail, I use the charging port on the battery and connect it to my power bank.
And the best part? It inflates my Nemo sleeping pad in less than two minutes.
For the rest of my Sleep System, I use a Sleeping Bag Liner to add a few extra degrees of warmth. It also helps keep my quilt cleaner when I’m out on trail. On my long-distance backpacking trips, it’s so much easier to wash a sleeping bag liner than my quilt.
I use an inflatable pillow, sleeping booties to help keep my feet warm and stuff all of the contents of my Sleep System, along with my sleeping clothes and socks, minus my sleeping pad inside a Sea to Summit 13-liter Dry Sack.
To pack my pack, I add my Sleep System waterproof bag to my pack first and then stuff it all the way at the bottom of the inside of my pack, horizontally.
SHELTER SYSTEM
This is also another gear change I made this year. I went from using a freestanding tent to a trekking pole tent and it’s been a pretty big weight and space savings.
I’ve been using Gossamer Gear’s The One ultralight trekking pole tent for my last few backpacking trips and I love it.
With this being one of the first trekking pole tents I’ve ever used, there was a little bit of a learning curve with figuring out how to set up this tent. Once I figured out the correct order in which to set up the tent along with the right length to set my trekking poles to, this tent has been super easy to set up out on trail.
It’s also pretty spacious inside. I can sit up inside the tent without hitting my head on the ceiling. I can fit my wide sleeping pad inside and still have plenty of room to keep my pack inside my tent near my feet. The vestibule also has a lot of room, which is nice for whenever I need to store anything outside of my tent. The One only weighs 22 ounces, which is a little more than a pound lighter than my previous freestanding tent.
Since The One doesn’t require tent poles for setup, there’s less components to pack, which creates more space inside my pack, making it easier to fit all of my other gear inside.
COOKING SYSTEM
As for my Cooking System, not much has changed here.
I’m still using my JetBoil Stash stove along with my Sea to Summit Long Spoon. I bring an REI small, light multi-towel to dry off my pot after boiling water in it. I use a small fuel canister, always have two lighters with me and depending on where I’m backpacking, I’ll store my food in either an Ursack or a hard-sided bear canister.
For my trip this summer along the PCT, I’ll be using both an Ursack and a hard-sided bear canister. I’ll use my hard-side bear canister while I go through the Sierra section of the PCT and then send it back home and switch it out for my Ursack once I reach the desert.
I did make two small changes to my Cook System this year though. First, I swapped out my DIY Backpacking Food Cozy for the Big Sky Insulated Food Pouch in a size medium. This thing only weighs an ounce, packs up small and helps rehydrate meals pretty quickly and efficiently.
Storing “Day Of” Backpacking Food
Also, instead of storing my “Day Of” food in a large Ziplock bag that usually rips at some point during my longer trips, I decided to go with a reusable bag option, the Hilltop Packs “Hey Bear” food bag.
At the beginning of each day, I put all of the food I plan on eating along with my electrolytes inside my “Day Of” food bag. Then, I store my “Day Of” food bag in the back mesh pocket of my pack for easy access whenever I stop for a break and want to eat throughout the day. This way I don’t ever have to get into the inside of the main compartment of my pack or even worse, need to access my hard-sided bear canister throughout the day, which can be kind of a pain to get in and out of.
To pack my Cooking System inside my pack, I set either my Ursack or hard-sided bear canister in the middle of my pack, along my spine, on top of my Sleep System. Then I put my sleeping pad on one side of my food bag or canister and on the other side, my tent.
If my tent is wet, I’ll stuff it in the outside mesh pocket of my pack. This way if I stop during the day and it’s not raining, I can quickly access my tent to lay it out and let it dry while stopped for a break.
PACKED CLOTHES
For my Packed Clothes, I only bring with me a lightweight rain jacket, a puffy jacket, a fleece and my sleep outfit which is just a tank top and shorts, along with a couple extra pairs of socks and a pair of liner gloves – all of which I’ve been using the same of for the last few years.
To pack my Packed Clothes inside my pack, I take them one by one and stuff them inside my pack, around my Ursack or hard-side bear canister, to help fill up those weird, empty spaces inside.
Underwear
Something I’ve changed for my Packed Clothing this year has been my underwear. I used to think that it didn’t matter what type of bra and underwear I wore out on trail – any sports bra and comfortable pair of underwear would do. Then I started testing out a whole wide range of bras and underwear for hiking and backpacking.
One of my favorite bras I’ve discovered while doing my research over the last year has been the Essential Busty Bra by Branwyn.
No, Branwyn didn’t sponsor any part of this post. I just really love wearing this bra, both on trail and off.
I love changing into this lightweight bra at the end of a full day of hiking. I love that its lightweight and underwire-free, which makes the fit super comfortable. Branwyn bras are made with their signature Merino wool, which is super soft and adds to the comfort factor of these bras. I also love that this bra is moisture wicking, odor neutralizing and breathable. I can wear this bra out on trail for several days and it doesn’t stink or leave me feeling funky like a lot of other sports bras I’ve worn in the past have.
Even though this is a low-impact bra I wear at the end of the day and to sleep in, I’ve still worn this bra while hiking using the convertible straps, which turns this into a cross-back and provides additional support without feeling restrictive.
As for underwear, I keep coming back to the Icebreaker Siren Hipkini briefs. They’re made of merino wool and Lycra. They’re odor-resistant and super comfortable. The hipkini briefs fit really well whenever I wear them hiking all day long. They have the perfect amount of stretch without getting stretched out and bunching up in the rear.
Both the Branwyn Essential Busty Bra and Icebreaker Siren Hipkini briefs also work perfectly as an on-trail bathing suit whenever I decide to jump into an alpine lake while I’m out on trail.
WATER FILTRATION SYSTEM
My Water Filtration System hasn’t really changed much this year. I’m still using the Sawyer Squeeze to filter my water along with the CNOC 2-liter Vecto Bag to collect dirty water in. I carry filtered drinking water in both a CNOC collapsible water bottle and a 1 liter SMART water bottle.
Something I’m doing a little different this year though is for my electrolytes and breakfast protein shakes. I’m using a small Nalgene bottle. It has a wider mouth opening, which makes adding electrolytes and powdered smoothies and cleaning it out when in town, so much easier than a bottle with a smaller mouth opening. I’m also adding this small protein ball shaker to help mix up smoothies more efficiently without the powder getting caked into the bottom of the bottle.
I store my water filter, dirty water bag and electrolytes bottle in the small, bottom, external side pockets on my pack. This way, I always have easy access to my Water Filtration System without having to dig for it inside my pack.
REPAIR/TOOL/TOILETRY KIT
My Repair/Tool/Toiletry Kit is pretty much staying the same this year.
Inside my stuff sack, I have my:
- Misc repair kit with tenacious tape and mini bottles of krazy glue
- Paracord
- My headlamp
- A travel cork massage ball
For toiletries,
- I’m switching from using travel-sized tubes of toothpaste to these toothpaste tablets that take up way less space
- A foldable, travel toothbrush
- Travel sized sunscreen
- A foldable travel hairbrush with a mirror that can also be used to signal in an emergency situation
- Body Glide
I keep my Repair/Tool/Toiletry Kit in a stuff sack and store it in the main compartment of my pack, wedged in near my food bag.
BACKPACKING FIRST AID KIT
For my First Aid Kit, I recently went through all of my medications and replaced anything that was expired with non-expired medications.
I was gifted this super cute medication organizer from one of my students in The Confident Solo Female Backpacker System and started using it in my First Aid Kit to store and organize all of the medications in my kit.
I’m also carrying two of these mini travel flip cap squeezable bottles of Dr Bronners soap in my kit that I filled myself at home.
I also updated my First Aid Kit with a new Hilltop Packs zipper pouch and some fun flexible and waterproof bandages in a variety of sizes.
I also replaced my Swiss Army knife with these travel folding scissors which I use all the time. I really love these scissors. Thank you, Topo, for gifting these travel folding scissors to me last year when I lost my First Aid Kit out on trail and for helping me piece together a first aid kit for the rest of my hike!
I keep my First Aid Kit in this zippered pouch from Hilltop Packs and store it in the main compartment of my pack, wedged in near my food bag.
To see the rest of the items I carry in my First Aid Kit, check this post where I walk you through how to set up your own backcountry first aid kit.
POOP KIT
Everything in my Poop Kit is staying the same this year.
Inside my Poop Kit, I have:
- A Deuce, lightweight trowel to dig my catholes
- A menstrual cup
- Portawipes to use for when I poop. Just like with TP, Portawipes should also be packed out instead of buried with poop.
- A roll of doggie bags to pack out my used Portawipes in
- Hand sanitizer
- And thanks to Anastasia from Kula Cloth, I now have a customized The Hungry Hiker Kula Cloth to use for whenever I pee outside or in pit toilets that don’t have TP stocked in them
I always like to keep my Poop Kit easily accessible throughout the day, so I keep it in the top, external side pocket on my pack. My Poop Kit bag is also a zippered pouch from Hilltop Packs.
MISC GEAR
For Misc Gear, this year, I’m bringing things with me like a pair of trekking poles, a lightweight umbrella, a bug repellant system and a pair of microspikes.
I always use a pair of trekking poles on every single backpacking trip I go on. My trekking poles are also the primary structure for my ultralight trekking pole tent.
I’m bringing my lightweight Gossamer Gear umbrella to use to help keep the sun off of me when traveling over the hot and exposed passes in the Sierra and to help create my own shade once I start hiking in the desert.
Bug Repellant System
Bugs are usually an issue for me every summer whenever I’m out on trail. To help prevent myself from getting eaten alive by bugs again this year, I’m coming heavily armed with my ramped-up Bug Repellant System, which includes:
- A bug bucket hat that I’ve used for years
- A bottle of the Sawyer Picaridin Insect Repellant Lotion, which I discovered for the first-time last year thanks to some of my students and it worked way better than the 100% deet spray I was using
And something new to me this year that I’m really excited to use was sent to me from FlexTail, which is their Tiny Repeller S – a 2-in-1 compact, electronic mosquito Repeller. The Tiny Repeller S has three repellant modes: camping mode which offers 10 feet of protection for up to 20 hours; Outdoor mode which offers 20 feet of protection for up to 10 hours and Super Mode which offers 40 feet of protection for up to 5 hours.
So far, this device has been pretty easy to use. I insert a repellent mat, turn on the device and select one of the three repellent modes. The Tiny Repeller then heats up in less than a minute and starts providing protection from mosquitos quickly and effectively. There’s also a small carabineer attached to the device so I can easily clip it onto the strap of my pack and use it while I’m hiking.
I love that this device provides continuous protection from bugs without having to put anything on my skin. It’s long-lasting and rechargeable and it only weighs 5.22 ounces.
In addition to repelling bugs, there’s also a camping light located on the device with multiple brightness options that you can use at camp once it’s dark out.
And the last item for my Misc Gear is a pair of microspikes, which I’ll plan on using when hiking over some of the big passes in the Sierra this summer, if they’re still covered with snow.
ELECTRONICS
As for the Electronics I’m bringing with me this summer, nothing has really changed.
I still plan on using my Garmin inReach Mini 2 as a satellite messenger to stay in contact with friends and family while I’m out on trail by myself.
I’ll be using my GoPro 10 with the small selfie stick to shoot all of my hiking videos this summer.
I still have my iPhone 12 Pro Max to use as my phone, to navigate my Garmin inReach device with through the pairing app and to utilize navigation GPS apps like FarOut and onX Backcountry while I’m out on trail so that I stay found, get information about town stops and various waypoints along the trail like water sources and campsites and get information about possible alternates in the area for when the trail is closed or I need to find a different way around a challenging water crossing.
To charge all of my electronics on trail, I use my Nitecore power bank, which is the same lightweight power bank I used last year.
When I’m in town, I’ll use my Anker Quick Charge Port along with my GoPro Dual Battery Charger to charge all of my electronics quickly and efficiently from my hotel room. I’m also bringing with me a lightweight extendable tripod to use when shooting videos out on trail this year.
Most of my electronics along with all of my charging cords will be kept in a Hilltop Packs Electronics Zipper pouch and then stored in the main compartment of the inside of my pack.
My Garmin inReach Mini 2 will sit on my pack shoulder strap so that it gets a clear view of the sky throughout the day. My GoPro and iPhone will be kept inside my Summit Bum fanny pack during the day for easy access while I’m hiking. And the lightweight tripod will be stored in the large, side, exterior pocket – the same pocket that will also have my lightweight umbrella and extra drinking water.
WORN CLOTHES
And finally, the clothes I’ll be hiking in. One thing people tend to overpack the most when they first start backpacking is clothing. When I first hiked the PCT back in 2018, one of the first things I sent home to myself was all of the extra clothes I had packed.
Clothes are heavy. I’m going to get dirty. So, I only carry what I need, which usually means one outfit to hike in and one outfit to sleep in. The only extra clothing I carry is socks and underwear.
This year, I swapped my old running shorts for a Purple Rain Skirts Adventure Dress, in purple of course!
I’ve been loving hiking in a dress so far this year because my legs are still exposed like they would be if I were wearing shorts, but I now don’t have to expose my backside whenever I go to the bathroom outside. Plus, this dress has two very large and functional pockets on each side, which I use all the time while hiking.
The rest of my hiking outfit this year will be the same, which includes:
- A light-colored sun hoodie
- ¼ cushion hiking socks
- A pair of super fun gaiters with rainbows and unicorns to help keep debris out of my shoes
- A pair of Altra Lone Peak 7s in purple
- A supportive racerback sports bra by Smartwool
- A pair of Icebreaker Hipkini Briefs
- My sunglasses
- A trucker hat to help keep the sun out of my eyes
And because I’ll be wearing all of these items throughout the day, they’re considered “wearable” items and don’t get counted towards my total base weight.
Base weight is all of the gear you carry in your pack, minus consumables like food, water and fuel AND the clothes you wear while you’re hiking.
According to my 2024 PCT SoBo Section Hike Gear List, my base weight is currently 23.59 pounds. This also includes both my Ursack and hard-sided bear canister along with some of the misc items I’ll be using in the Sierra section of the trail like my bug repellant system and a pair of microspikes.
Once I finish the Sierra section, I’ll send home my hard-sided bear canister along with the microspikes and bug repellant system since I won’t need these things when hiking in the desert, making my overall base weight much lighter.
I hope by sharing with you each of the backpacking gear systems that have worked for me over the years and all of the backpacking gear I’ll be bringing with me out on trail this summer, this has given you some good ideas for when packing for your own overnight backpacking trips this summer.
When it comes to backpacking, there’s no one right way to do it. We all backpack a little differently, based on our own personal preferences and the types of trips we want to go on. What works for me might not work for you.
Backpacking gear is so personal and often times people can be really passionate about the gear they love and even don’t love using. My recommendation is to find the gear that will work for you and will make you happy, comfortable and feel safe whenever you’re out on trail.
Happy Trails and Keep on Truckin’!
Disclaimer: The-Hungry-Hiker.com is a participant in the Amazon Affiliate Links and AvantlInks Program, affiliate advertising programs designed to provide a means for sites to earn advertising fees by advertising and linking to Amazon.com and other affiliated sites at no cost to you. Please note, I only link to products and services I personally use and trust.
Super helpful! Thank you!
Glad this one was helpful!
Love your site and youtube.
My wife watches your videos too.
I live in Deer Lodge for 10 your so I know Missoula well. If you have time visit Grant-Kohrs Ranch NHS.
Awesome! Thanks!